
Ultimate Guide to Microblading: Process, Healing, and Aftercare
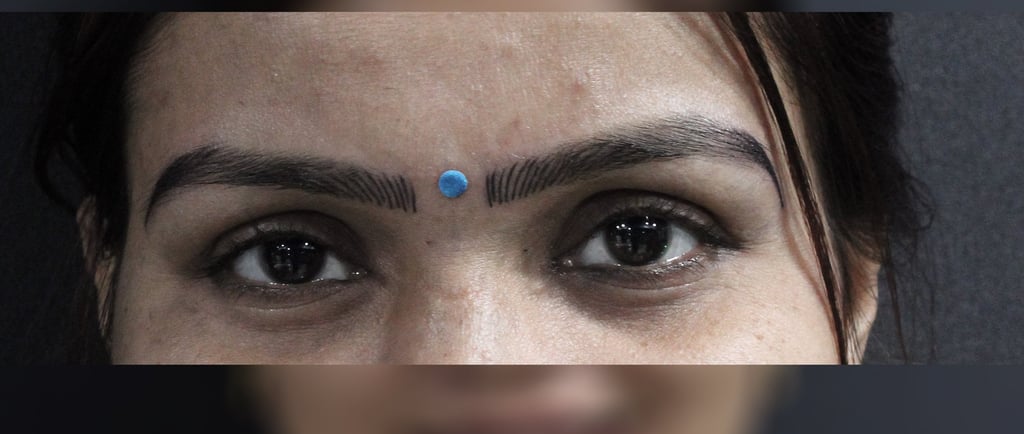
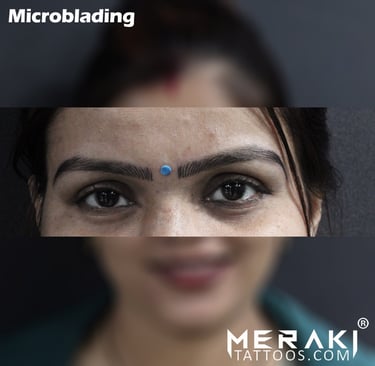
Microblading is a semi-permanent cosmetic procedure that enhances the appearance of eyebrows by creating hair-like strokes using a specialized hand-held tool. This technique deposits pigment into the skin, giving the illusion of fuller, well-shaped brows. Unlike traditional eyebrow tattooing, microblading offers a more natural and subtle look, making it a popular choice for those looking to enhance their brows without daily makeup application.
2/11/20253 min read
Benefits of Microblading
Natural-Looking Results: The fine, hair-like strokes mimic real eyebrow hair, providing a realistic and fuller appearance.
Long-Lasting Effect: Typically lasts between 1-3 years, depending on skin type and aftercare, reducing the need for daily eyebrow makeup.
Time-Saving: Eliminates the hassle of filling in brows daily, making morning routines faster and easier.
Customizable Shape and Color: The procedure is tailored to individual face shapes and preferences, ensuring a flattering and personalized look.
Waterproof and Smudge-Proof: Unlike brow pencils or powders, microbladed eyebrows do not smudge or fade with sweat or water exposure.
Boosts Confidence: Enhances facial symmetry and gives a polished look, improving self-confidence.
Who is a Good Candidate for Microblading?
Microblading is ideal for:
Individuals with thin, sparse, or overplucked eyebrows looking for a fuller and more defined shape.
People with alopecia or hair loss due to medical conditions who want natural-looking brows.
Those who want to save time on their daily makeup routine.
Individuals with an active lifestyle who need smudge-proof brows.
Anyone looking for a semi-permanent solution to enhance their eyebrows.
However, microblading may not be suitable for:
People with oily skin (as results may fade faster or blur over time).
Individuals with certain medical conditions such as diabetes, skin diseases, or those undergoing chemotherapy.
Pregnant or nursing women.
Those prone to keloid scarring or allergic reactions to pigments.
Step-by-Step Microblading Process
1. Consultation and Preparation
Before the procedure, a consultation is conducted to discuss the client’s expectations, desired brow shape, and color. The technician assesses the client’s skin type, medical history, and lifestyle to determine suitability for the procedure. Patch tests may be performed to check for allergic reactions to pigments.
2. Mapping and Shaping the Brows
The technician carefully maps the brows according to the client’s facial symmetry and bone structure. Measurements are taken to ensure both brows are even and proportionate. A temporary outline is drawn, allowing the client to approve the shape before proceeding.
3. Numbing Process
A topical numbing cream is applied to minimize discomfort. This is left on for about 20-30 minutes, ensuring the procedure is as painless as possible. Some technicians may also use a secondary numbing agent during the process if needed.
4. Microblading Technique
Using a handheld microblade tool, the technician creates fine, hair-like strokes by implanting pigment into the upper layers of the skin. The process is done with precision, following the mapped outline. The strokes blend seamlessly with the natural brow hairs, creating a natural, fuller look.
5. After-Procedure Care
Once the procedure is complete, the technician provides aftercare instructions to ensure proper healing. Key aftercare steps include:
Avoiding water, sweat, and makeup on the brows for at least 7-10 days.
Applying a prescribed healing ointment as directed.
Not picking at scabs or flakes during the healing process.
Avoiding direct sunlight, swimming pools, and saunas until fully healed.
Attending a touch-up session after 4-6 weeks to perfect the brows.
Following these steps ensures the best results and longevity of the microblading treatment.
Microblading Healing Process (Day-by-Day Guide)
Day 1-2: Initial Stage
Expect redness, slight swelling, and tenderness in the brow area.
Pigment appears darker and bolder than the final result.
Some mild discomfort or tightness may be felt.
Day 3-7: Scabbing and Flaking Begins
Brows may start to scab, flake, and feel dry.
Avoid picking or scratching to prevent patchy healing.
Pigment may appear uneven during this phase.
Day 8-14: Lightening of Pigment and Skin Settling
Scabs will naturally fall off, revealing lighter and softer brows.
The pigment may seem too light, but this is normal as it settles.
Some areas might appear faded or patchy, but they will darken slightly as healing progresses.
Day 15-30: Brows Start to Look More Natural
The true color of the brows starts to emerge.
Any patchy areas begin to blend in naturally.
Brows look softer and more defined as the skin fully heals.
Touch-up Session: Why It’s Necessary
A touch-up session after 4-6 weeks is essential to perfect the brows.
Helps fill in any areas where pigment did not retain properly.
Ensures even color and shape for long-lasting results.
Adjustments can be made to enhance the final appearance.
By following the healing process and aftercare guidelines, clients can achieve beautiful, long-lasting microbladed eyebrows.
Do’s and Don’ts After Microblading
Skincare Tips
Keep the brow area dry for at least 7-10 days.
Apply a recommended healing ointment as instructed.
Avoid using skincare products with exfoliating acids (AHAs, BHAs, retinol) near the brows.
Avoiding Infections and Ensuring Best Results
Do not pick, scratch, or rub the healing brows.
Avoid direct sun exposure, saunas, swimming pools, and excessive sweating.
Use a clean pillowcase and avoid sleeping on your face.
Follow all aftercare instructions provided by the technician.
Frequently Asked Questions (FAQs)
How long does microblading last?
Microblading typically lasts between 1-3 years, depending on skin type, lifestyle, and aftercare. Oily skin types may experience faster fading.
Is it painful?
Most clients experience minimal discomfort due to the use of numbing cream. Sensitivity varies, but the sensation is often described as a slight scratching feeling.
Can it be removed or corrected?
Yes, microblading can be corrected or lightened through techniques like saline removal or laser treatments. It is best to consult with a professional for correction options.
By following proper aftercare and understanding the procedure, clients can achieve beautifully enhanced brows with long-lasting results.
Follow Us
📞Call/WhatsApp: 9099555058


Meraki tattoos and Piercing studio is an Ahmedabad’s leading tattoo and piercing studio
📍 Address :
132,first floor,Himalaya arcade B,
near lapinoz pizza
Opp vastrapur lake, vastrapur, Ahmedabad
Studio Timings
All Days, 11:00 AM - 09:30 PM